


Tutorial by Jcuttlebear01 aka JoAnn
3/06/2014
I do these tutorials for fun and not
for any profit. I use them also as a learning
tool to
help others learn the fun and art of paint shop
pro.
Everything I use I have collected or bought and
I
don't claim to have
made anything other then the tag.
----------------------------------------------------------------------------
All graphics I use, the copy write stays with the
original artist.
-------------------------------------------------------------------------------
Notes:
All settings will remain the same unless
otherwise noted
This tutorial assumes you have a working
knowledge of PSP
Remember to save often in case your psp
crashes.
I did this in PSP 9 but sure any one will
work
--------------------------------------------------------------------------------
Supplies
Mask ~ of choice
Tube of choice~Tube I used
is called Alice, and its a Very Many tube~ you can buy it HERE
On header tag another tube of Very Many called Andrea you can
buy it HERE
Check out all the pretty tubes on the site.
Font~ I used Brock Script
------------------------------------------------------------------------------
Open template duplicate and close
original.
You have these layers.
Delete the ones I have closed off I'm not using
them.

Canvas size

In layer pallet highlight layer 3, I close off
all my layers
except for the one I'm working on.
Select>magic wand tool. If you use a feather
it gives you
smoother edges.
Outside Raster
3>selection>invert
Select a paper I used PP 10 from the
kit.
Copy and paste into selection.
Effects>3D>Inner bevel

Deselect
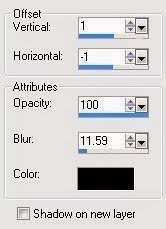
Drop shadow
Close off raster 3 and move up to the
circle>magic wand
same setting copy and paste into a paper of
choice>PP 12 is what I used.
Same bevel effect>deselect>add drop
shadow.
Move up to the back rectangle>select
inside>
copy and paste into a background of
choice>
I used PP 22
Deselect
Add bevel>add drop shadow
Move up to rectangle frame>magic
wand>
I flood filled with gold beads>inner
bevel>deselect>drop shadow
Highlight>dotted outline>deform tool and
move it so it fits inside the frame.

Highlight the top right rectangle>Magic
wand>copy
paste into selection paper of
choice>
I used PP 23
---------------------------------------------------------------------
Bevel>deselect>drop shadow.
On the dotted lines>Colorize them if you
wish.
I did them in a green.
-----------------------------------------------------------------------
Now we are ready to add the
accents
Add>123 from the kit>resize by 65
percent>add drop shadow
Duplicate this about 3 times and spread them out
how you want them.

Add>40 from the kit>resize by 60
percent
Add drop shadow.
Duplicate>move over to the left side>I
also
wanted the swirl to show up more so resized
it
by 110 percent>that is up to you.

Add>number 67 resize>65
percent>
Place over by the stone wall.

Add>number 34>resize by 50
percent>duplicate and move
over on the other stone wall part.
Add drop shadow
---------------------------------------------------------------
Add>number 47>resize 40 percent>drop
shadow.
-----------------------------------------------------------------
Add>number 27>mirror image>move to the
left toward
the bottom.
Add drop shadow
----------------------------------------------------------------
Add>number 15 resize>60 percent>move
over on the stump>
mirror>add drop shadow.
------------------------------------------------------------------
Add>number 35 resize 40
percent>mirror>place on the other stump
add drop shadow
---------------------------------------------------------------
---------------------------------------------------------------
Add>number 41>resize 55 percent>add drop
shadow
Move it how you want it.
----------------------------------------------------------------
Add>number 31 resize 40 percent>add drop
shadow
---------------------------------------------------------------
Add>Number 56>resize 45 percent>drop
shadow
place in front of the stumps.
------------------------------------------------------------------
Add>number 16 resize 25 percent
mirror>place on mushrooms>
drop shadow.
------------------------------------------------------------------
Copy and paste as new layer>tube of
choice.
Resize as needed.
The one I used went to 40 percent. Move over to
the right side
Add drop shadow.
-------------------------------------------------------------------
Add word art of choice>drop shadow

Add any thing else you wish to at this
time.
When you have moved everything around like you
want it.
Merge layers>add drop shadow.
-----------------------------------------------------------
Mask
Copy and paste a paper of choice as a new
layer>arrange send
to bottom
Mask of choice.
Layers>new mask layer>from image>

Merge group
Effects>3 D inner bevel

Add water mark
Resize to your liking
Adjust sharpen
-----------------------------------------------------------
Your now ready to save your work of art.
Would love to see what you do with
this.
Thank you for giving my tutorial a
try.
I do hope you have enjoyed this
tutorial, and learned
something new.
Have any questions or need
help.
Just let me know, I'm always happy
to help any way I can.

-----------------------------------------------------------------------
Thank you~BrizExoticEyes

Thank you~BrizExoticEyes